Introduction
In this blog we will go over a basic introduction to high performance computer (HPC). Before this project I had no previous experience with constructing HPCs. THe HPC Compute Cluster Project arose when the research group I participate in realized they were constantly hitting limits in the existing HPC environment (Temple’s OwlsNest). Since OwlsNest is a HPC cluster controlled by Temple University we had little say over the administration of its hardware resources file system structure, ect. By building our own HPC with our new grant, we can have more fine tool control of the entire HPC environment.
In 2015, we received a ~$27.5k grant that allowed us to purchase hardware for our AutoEEG project. I leaded the effort in trying to setup, optimize and maintain the cluster. In this blog I lay out the research, testing, and results of my quest.
Click here for a poster that summarizes the project.
Research
Before we go further I researched the differences between Grid Computing and Cluster Computing.
Grid Computing vs Cluster Computing
Grid Computing
Grid computing (a subset of distributive computing) is using a collection of computing resources to solve a problem. For example, you have a University whose computer lab’s sit idle most of the day. Setting up a grid computing network allows for one to use these machines’ computing power to create one super virtual computer. The computers in the grid tend to run vastly different hardware so performance can vary. It is hard to optimize jobs for a grid computing configuration due to the different hardware architectures. Popular projects you may have heard of before are folding at home or group bitcoin mining. In general, a grid computing platform is a collection of computers that solve a problem using varying operating systems, differing hardware, ect.
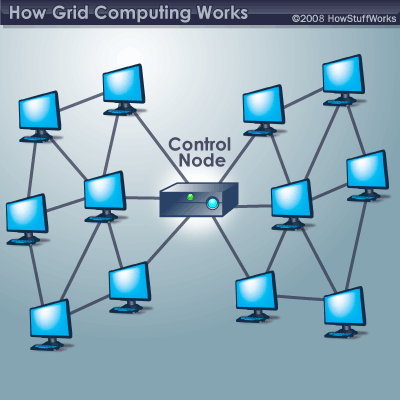
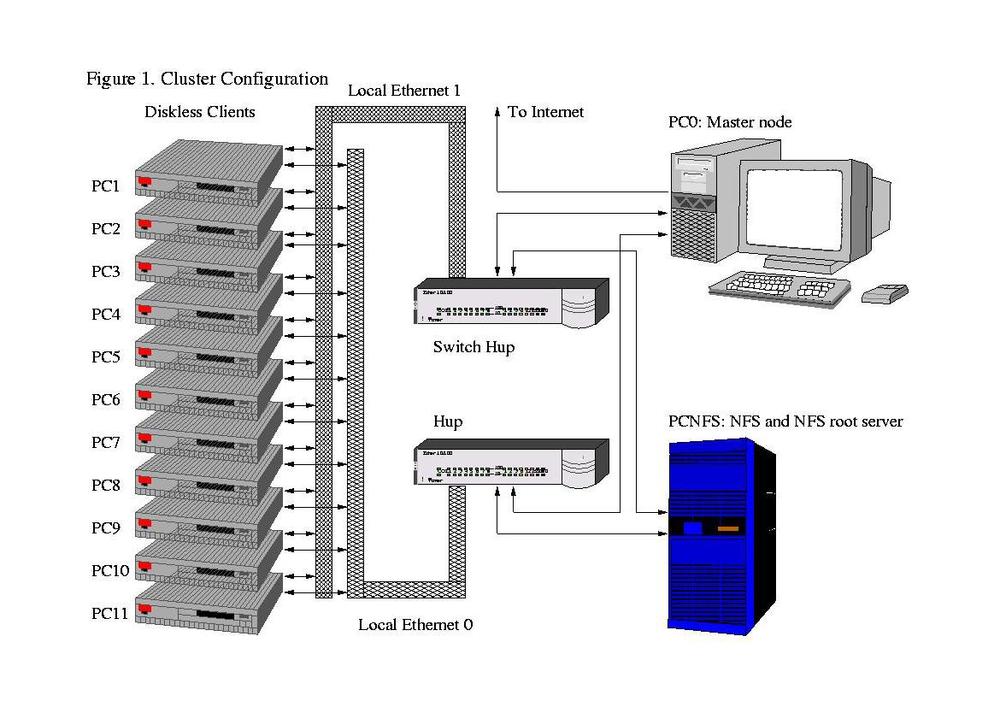
Computer Cluster
Clustering is different from grid computing in that it dedicates physical computers to running parallelized jobs. A computer cluster typically runs the same hardware across all computing nodes. Since clusters are locally stored together there is a stronger network backbone connecting the computers together. Big projects include Beowulf Clusters running MPI (MPICH or Open MPI) or PVM and then there is Hadoop. Although a quick Google search separates MPI from Hadoop.
MPI is useful for when you don’t have large data sets to be shared amongst computing nodes. Hadoop is best for dealing with BIG Data (we are talking at least 10TB++) since every node has local access to the data. Hadoop uses Hadoop Distributed File-System (HDFS) that stores copies of a database across numerous nodes. ‘Rjurney’ from stackoverflow.com further explains the difference:
“MPI is Message Passing Interface. Right there in the name - there is no data locality. You send the data to another node for it to be computed on. Thus MPI is network-bound in terms of performance when working with large data.
MapReduce with the Hadoop Distributed File System duplicates data so that you can do your compute in local storage - streaming off the disk and straight to the processor. Thus MapReduce takes advantage of local storage to avoid the network bottleneck when working with large data.
This is not to say that MapReduce doesn’t use the network… it does: and the shuffle is often the slowest part of a job! But it uses it as little, and as efficiently as possible.
To sum it up: Hadoop (and Google’s stuff before it) did not use MPI because it could not have used MPI and worked. MapReduce systems were developed specifically to address MPI’s shortcomings in light of trends in hardware: disk capacity exploding (and data with it), disk speed stagnant, networks slow, processor gigahertz peaked, multi-core taking over Moore’s law.” Source
Hadoop
At the beginning we were eager to start using the latest technologies in the HPC community. Right off the bat we heard of a HPC environment called Hadoop. Hadoop is interesting in that it allows for massive amounts nodes that all are optimized to work with ‘big data’, MapReduce (aka YARN - MapReducev2) and using a optimized HPC architecture. My professor immediately had me working on setting up such a cluster.
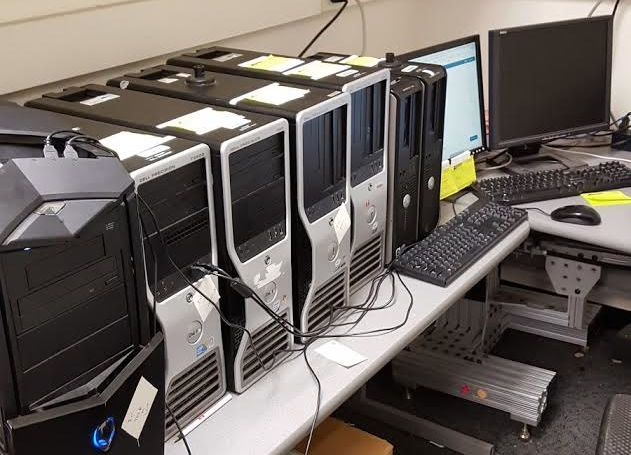
For the testing purposes we were fortunate enough to obtain 7 PCs from Temple’s COE IT department. The PCs were old (3x Dell Precision T3500 and two Dell OptiPlex 755) but we figured the PCs were adequate to setup a test HPC setup. From here on out these set of computers will be referred to as the ‘NEDC Test Cluster’. A picture of the machines is seen below:
In my research I start where any student would: Google Search. From Google search I found a countless number of articles claiming to be the one comprehensive guide to setting up a Hadoop Cluster. I also found two Lynda tutorials and one YouTube playlist did help in trying to understand Hadoop:
- Virtualization Essential Training (Lynda)
- Hadoop Fundamentals (Lynda)
- Big Ideas: Demystifying Hadoop (Youtube)
I recommend starting with “Virtualization Essential Training” which goes over basics in Virtualizations. Servers today are highly virtualized in order to take advantage of all hardware resources available on the server. It also is a great utility for deploying virtualized images of OSs quickly to a server. The second tutorial goes over what Hadoop is all about. ‘Lynnn Langit’ starts you off with the basics of Hadoop and how it connects to other concepts you may have heard before. Lastly, “Big Ideas: Demystifying Hadoop” is a nice YouTube series that illustrates Hadoop’s fundamental core concepts.
After watching all the tutorials I listed above, I felt I was ready to
tackle the beast of Hadoop. To aid my setup process I followed a good text
resource that goes through the recommended specs and configurations for
Apache Hadoop.
(Note the source is dated 2013/14):
- “Hadoop Cluster Deployment” - Danil Zburivsky - Amazon Link
The source listed above is a great starting point for understanding Hadoop and as a guide to installing Hadoop. Following the “Hadoop Cluster Deployment” guide I was able to get up in running with Cloudera’s Open Source Distribution of Hadoop: CDH. The interface was nice and very user friendly. However, in order to run my research groups scripts on Hadoop we would need to write MapReducev2 Java code to parallelize our jobs. With the developers we have on staff, we do not have time to switch everyone over to learning Java and writing MapReduce code for their scripts. Also, in the test environment we setup we ran in over allocation of RAM issues that restricted the tests we could run. Specifically the main node was running most Hadoop management services and quickly ran out of RAM. The main node had 6GB of RAM but still over allocated. So a warning to other Hadoop testers: Use more than 6GB of RAM on your main node.
Note that at this point in the project I had to transfer one compute node to being the research group’s web server. Another PC was removed from the group of 7 since its BIOS was password locked. I could not get that PC to boot from the network card - PXE (TFTP). The other node (the Alienware) is being used as a main node since it has a dual NIC. I used that PC to create a teddy bear network so the compute nodes could have network access to Temple’s MAC restricted network. After these alterations from 7 PCs provided by Temple’s IT staff we only have 4 compute nodes (with varying hardware specs).
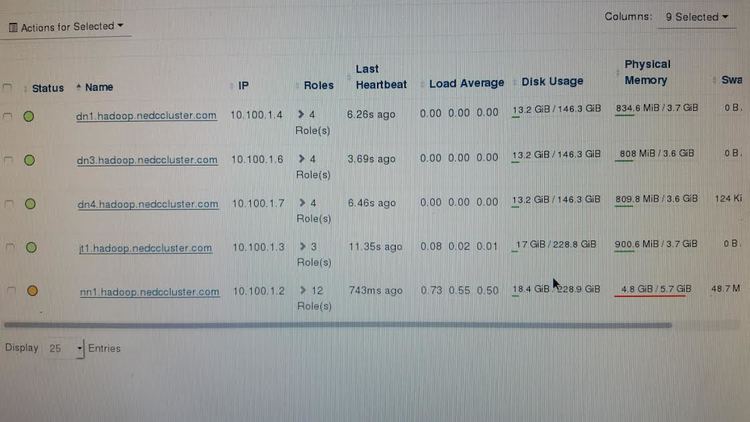
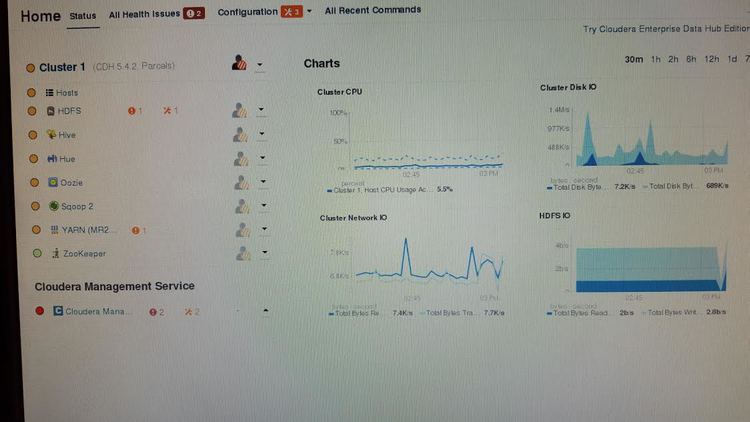
Great so Hadoop is running but we can not use it without heavily adapting our code; bummer. What other options do we have? Well at this time our group currently uses Temple’s HPC Cluster OwlsNest. Our scripts are ran using shell scripts in the terminal which we submit to OwlsNest using the Torque Job Scheduler. To ensure maximum compatibility my professor told me to look into setting up a cluster that mimics OwlsNest. That was we can run on our research group’s own cluster or OwlsNest with ease. We also would not have to teach our developers and entire new configuration that is Hadoop Yarn. We therefore looked to alternative HPC architectures similar to Torque.
Torque
For the AutoEEG project we decided to try another HPC implementation: Torque Job Scheduler instead of Hadoop. The benefit of Hadoop was that it had HDFS built into its environment to store all our data locally. We can mimic HDFS functionality by using a network file system share (NFS). It is important to note however that since there is no data locality, the cluster will will likely require a significant network backbone to support compute node’s access the main node NFS. It really depends on the what the jobs we run on the cluster depend on (IO, RAM, Core Speed). In our scenario we only have four compute nodes connecting to the main node via a 1GbE connection.
I had a lot of help in discovering these differing HPC resources by reading Temple’s OwlsNest HPC page and Adam DeConinck’s blog. I highly recommend the blog!
The blog referenced recommends using the following to deploy a HPC cluster.
My Preferred Software Stack
Just to summarize at the end: here is my own preferred stack, subject to change based on the needs of the particular situation.
- Warewulf for provisioning
- Warewulf and Ansible for configuration management
- OpenMPI for MPI, or whatever your app works best with
- Environment modules (Lmod) for managing different libraries and compilers
- EasyBuild for automating software builds
- SLURM for job scheduling
- NFS for a simple shared filesystem, or Lustre if I need the performance
- Ganglia and Nagios for monitoring. But the right answer is to always benchmark, profile, and talk to your users! Source
As mentioned in Adam’s blog you should talk to your users about what best fits your group. In my instances I followed Adam’s blog closely. It was one of the only sources I found that lists various resources to use for different parts of the HPC environment. I will go one by one and reiterate briefly how each program contributes to a HPC ecosystem.
Also check out Jeff Layton’s (Admin-Magazine) four part walk-through release on setting up Warewulf and Torque. Note at the point I wrote this blog, the articles were already dated.
- Warewulf Cluster Manager – Part 1
- Warewulf Cluster Manager – Part 2
- Warewulf Cluster Manager – Part 3
- Warewulf Cluster Manager – Part 4
Provisioning
Let us say you there is a new update to a certain package that fixes a massive security hole; albeit most HPC compute nodes are not directly connected to the Internet but entertain me for a second. You may have 4 to 100+ nodes in your cluster environment and you definitely do not want to go one by one to each machine updating the packages installed on it. You can also run into an issue where a machine can use a different REPO compared to another compute node thus you end up having differing versions of the same package installed. What a headache no?
Here comes file provisioning to the rescue! In my HPC cluster I chose Warewulf since it is a open-source project aiming to solve the issue described. With Warewulf’s VNFS you are able to create a ‘golden image’ which interacts with the main node and push images to your compute nodes. Essentially, one keyboard for all the machines. You can have multiple versions of a OS installed ready to push to your compute nodes on demand. It is a great utility that carries over to configuration management.
Configuration Management
Previously we created our perfect ‘golden image’ of an OS install but you still have to distribute that image to all your compute nodes. If you used Warewulf like I did for your provisioning this step comes easily. Warewulf setups up a TFTP server for your compute nodes can boot over the network. You first need to configure your compute node’s BIOS to boot over the network using PXE. Warewulf takes care of the rest.
You can also add files to your provision list which Warewulf will monitor
for changes and update in while a compute node is running. This tool is
useful if you are adding new users to your cluster and do not want to take
down the entire cluster to just add one new user. Common examples to
provision are /etc/{group, passwd, shadow}, and /etc/hosts.
MPI
Message Passing Interface is a way for your cluster to intelligently parallelize jobs. I used Open-MPI on my cluster but there are various other options to choose from but they all offer the similar functionality.
Environment Variable/EasyBuild
Adam DeConinck mentions in his blog the use of LMOD to handle environmental variables. At this moment our research group handles user environments by having them download a configuration file from the internet and installing a common environment (ISIP environment). I therefore did NOT installed the LMOD nor easybuild tools.
Job Scheduler
For job scheduling I decided to stick with the environment we are familiar with and install Torque. The job scheduler handles submitting jobs to your cluster from your main node. The particulars to creating job batch scripts depends on which job scheduler you are using. As mentioned previously, OwlsNest uses the Torque Job Scheduler to run jobs across the cluster, thus is why we chose Torque over SLURM.
Torque has native support for MPI and an advanced job prioritizer Maui/Moab. Directly from Adaptive computing site they recommend using a more intelligent scheduler such as Maui/Moab:
“The default TORQUE scheduler,
pbs_sched, is very basic and will provide poor utilization of your cluster’s resources. Other options, such as Maui Scheduler or Moab Workload Manager, are highly recommended.” Source
Maui allows you set priority users by allocating weight scales, max job runtimes, CPU resource limits, ect. It is a versatile tool that takes hours of configuration to setup correctly. It is still recommended over the default ‘pbs_sched’ Torque ships with.
NFS
For file sharing across all nodes I stuck with NFS. Most Debian instances of Linux ship with compatibility to connect to a NFS. To configure follow the guide to export you desired volumes/folders to the network. Then configure your VNFS to mount these points upon boot. Since our configuration only consists of less than 15 nodes we figured we did not need to consider Luster or GlusterFS for our configuration.
Cluster Monitoring
For cluster monitoring I stuck with Ganglia. Ganglia provides you with a web interface to see your resource usage across your entire cluster. Big sites such as Wikimedia, and Temple’s own OwlsNest use Ganglia to monitor resources.
You will see later in the blog that I use Ganglia to monitor my NEDC test cluster as I run multiple jobs on our cluster. The tests are used to see what resources our research team group requires most to successfully complete jobs. Between the job summary Torque provides you through email and Ganglia, we can make educated assumptions on the hardware resources used by our scripts.
Cluster Final Configuration
So in summary we are using Torque (w/ MAUI) as a job scheduler. For cluster monitoring will use Ganglia and Nagios. They allow for monitoring of resources and handle node failure notification. For system deployment/configuration we use will use Warewulf. The back end is being serviced by a NFS system.
Procedure
Testing our NEDC Test Cluster
To really price out the final hardware purchase for our research group’s $27.5k budget we are required to run the main scripts for our AutoEEG project on our cluster. The tests will indicate whether we need to spend more on higher amounts of RAM, faster cores, SSD IO performance, or a high bandwidth network backbone.
Background (5 Nodes):
- 1x Main Node: Core i7 930 , 3GB RAM, 3 HDD (
sda1 /boot250GB,sdb1 /dsk1160GB,sdc1 /dsk2250GB). The job is ran using data hosted off a NFS hosted on this main node under the disksdc1. - 4x Compute Nodes: 3x of the compute nodes (
n002-4) are using Core 2 Duos and one 4 core Xeon (n001).n001has 6GB RAM installed whilen002/3have 4GB andn004has 2GB.
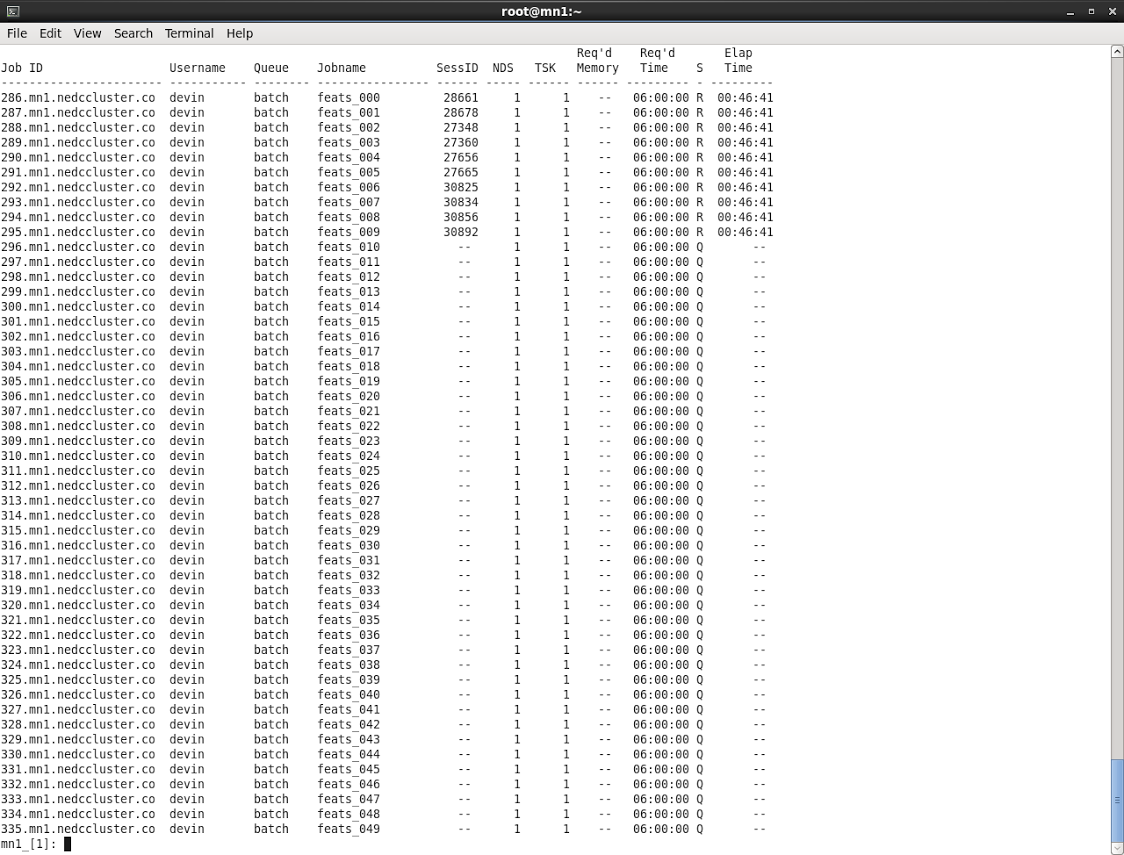
The job ran on the cluster was gen_feats.sh. The job is, “is a small
experiment that runs on a single processor, and uses a very limited amount
of data”. Each job is running across 1000 EDF files. There are 10 jobs
running simultaneously (since we have 10 cores amongst our compute test
nodes). I submitted the job with a wall time of 6 hrs.
Also, I have one (instead of fifty) instance of the job running on Temple University HPC Cluster OwlsNest. We will compare the two clusters to see how performance differs.
The purpose of this test is to see if their are hardware limitations (such as disk/network bandwidth) we should note before buying our hardware.
Results
NEDC Test Cluster
After running the experiment for 45mins we can look at Ganglia (a cluster resource monitor) to see the hardware resource usage across our cluster.
As expected the job is fully loading our four compute nodes. By default the tool allows us to see the usage of the cluster is the past hour:
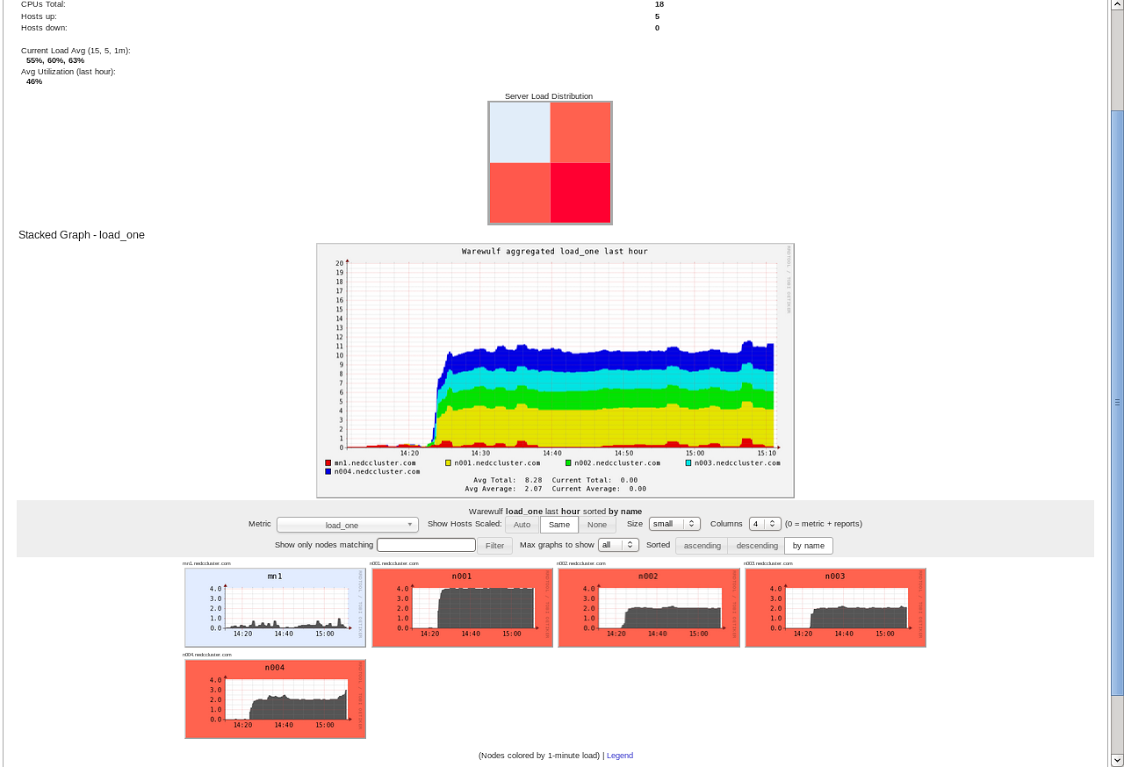
Great, the cluster works! What we are really interested though is to see the hardware usage as we run the job. First we can observe the usage of our cores across all nodes (besides main node) are maxed for the majority of time.
CPU
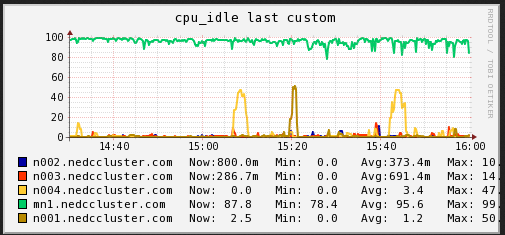
In the plot above note there are instances however where our nodes are idle for a brief period of time. What is the cause of the drop in utilization? Let us look at other resource usages over the time period 14:30->16:00.
Memory
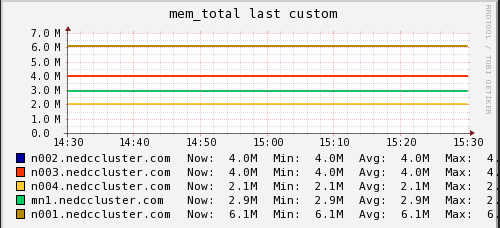
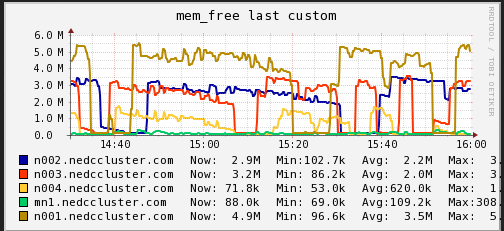
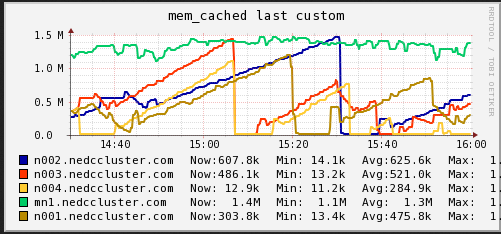
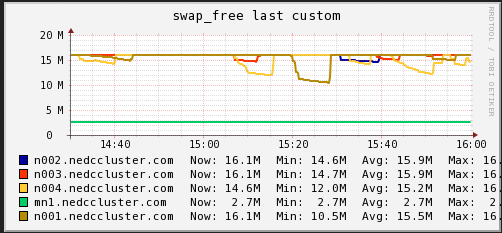
In these graphs we can see that on average the main node has no free memory (An oversight that only is 3GB installed). The limited amount of RAM is a potential bottleneck for cluster job. On the compute nodes, we see a steady increase in memory usage until and then a which to HDD swap. When we see the job start using swap memory our CPU hiccups and utilization drops for a minute or two. It appears that the local RAM is causing brief periods of CPU usage interruption.
Disk IO
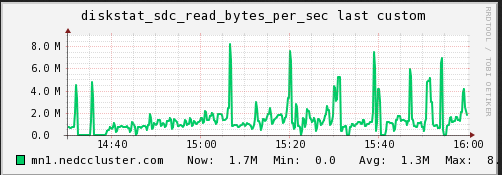
We are also curious if the disk /network hosting the data on the mn
(sdc1) was becoming a bottleneck (IO performance). I captured the
read/write operations as well as the network traffic over the same
period time.
![SDC Write (NEDC Test Cluster)] (/img/posts/hpc-batch-processing/nedc-test-cluster-sdcwrite.png “SDC Write (NEDC Test Cluster)”)
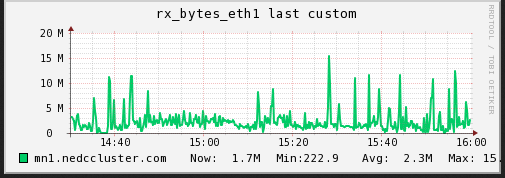
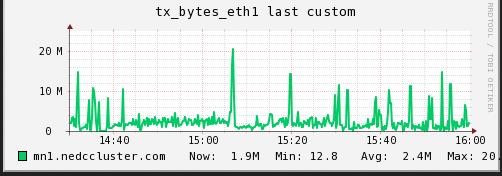
As can be seen (although it is slightly cut off), the max read speed from the disk was recorded at 8.X MB/s and the max write speed was 13.X MB/s. The network corresponds with tx at max 20.X MB/s and rx at max 15.X MB/s. The average is much lower. In this test I do not believe the bottleneck is caused by a limitation from the IO.
OwlsNest Cluster
Like I said previously, I’m running the same job on OwlsNest (Temple’s HPC cluster). After waiting in the queue, the job started 19 mins after submitting. I ran the test during off -peak times so the job was picked up quickly from the job scheduler. The node that took the job was w006. OwlsNest also uses Ganglia for cluster monitoring so we can make similar comparison to those seen on our NEDC test cluster.
It appears that OwlsNest reserves an entire node to process one job, even
when I specify that the job will only use one core on a node. Reserving
the entire node is done to ensure a user has access to all node resources
as specified on the
hpc.temple.edu website. We can see
that by the fact pbs_jobs = 1 in the graph below.
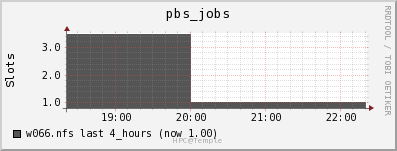
The fact it only processes one job per node is actually beneficial for our test as it allows us to see the entire usage of the job on higher end hardware. I will now display the usage of the node’s various hardware resources.
Node Specs
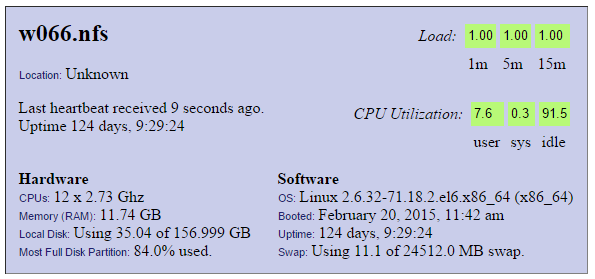
CPU
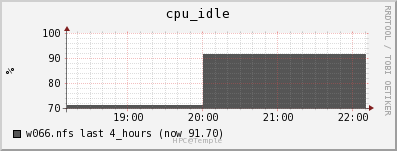
Note how the CPU is fully loading the one CPU core (100/12=8.3%). 100% CPU utilization is desired.
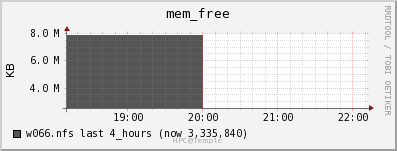
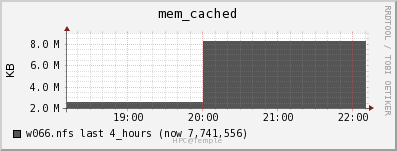
Memory
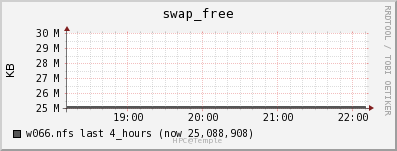
Disk
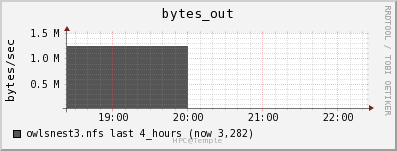
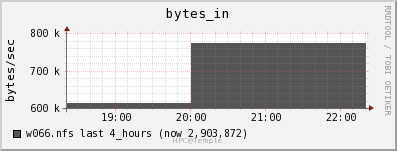
There is no way to see the actual disk bandwidth usage. Also the data is stored on OwlsNest NFS server owlsnest3.nfs. Instead I will look at the network usage of the owlsnest3.nfs.
The network usage is low especially for 1GbE connections throughout the cluster.
Network
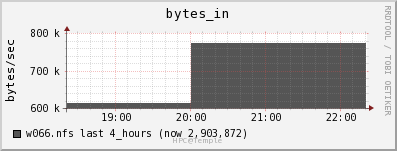
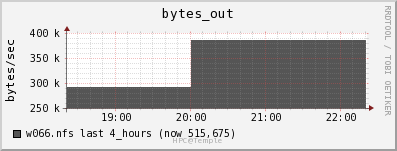
The file server appears to be able to keep up with the data draw from the job. The job is only reading in data at a rate of 2MB/s and out at a rate of 0.5 MB/s.
Comparing NEDC Test Cluster with OwlsNest
I was worried that our hardware purchase would be hurt by lack of memory,
or disk bandwidth. However, from my test run of gen_feats it appears that
our script is CPU bottlenecked. Thus I can conclude that the hardware
purchase would benefit from as many fast CPU cores as possible. Large
amounts of RAM is also needed to run these jobs. The job results summarize
our findings nicely:
| Resource | Intel Xeon E5506 (4C) @ 2.133 GHz and 6GB RAM (NEDC Test Cluster) | Intel Xeon X5660 (6C) @ 2.8 GHz and 12GB RAM (OwlsNest ) |
|---|---|---|
| Files Processed | 777 Files Successful | 1000 Files Successful |
| JobName | gen_feats | gen_feats |
| Exec host | n001.nedccluster.com/0 | w066/0 |
| Exit Status | 0 | 0 |
| CPU Time | 07:45:52 | 05:14:17 |
| Memory Usage | 3459788kb | 3453572kb |
| Virtual Memory Usage | 3498944kb | 3690128kb |
| Runtime | 07:53:22 | 05:19:17 |
We can see the NEDC test cluster was substantially slower. It took approximately 8 hrs to complete only 777 out of 1000 files successfully. We suspect there were IO bottlenecks limiting the write access to the NFS. On OwlsNest we do not see this problem. It completed all 1000 EDFs successfully. However, both tests indicate that the scripts uses 3.5GB of RAM to run. RAM usage will be an important factor when finalizing the build for our actual NEDC compute cluster.
These test indicate that the NFS doesn’t need SSDs nor 10GbE. We may want to put SSDs inside our compute nodes to act as swap space in case we run out of RAM on the compute nodes.
Lastly, note the faster compute time on OwlsNest compared to our test cluster. The CPUs on OwlsNest are running at a faster clock speed and are based on a newer hardware architecture so this too was an expect result.
NueroNix - Final Configuration
Our new cluster was given the NeuroNix. ‘Neuro’ explains our work with the EEGs/the brain and ‘Nix’ is a play on Linux.
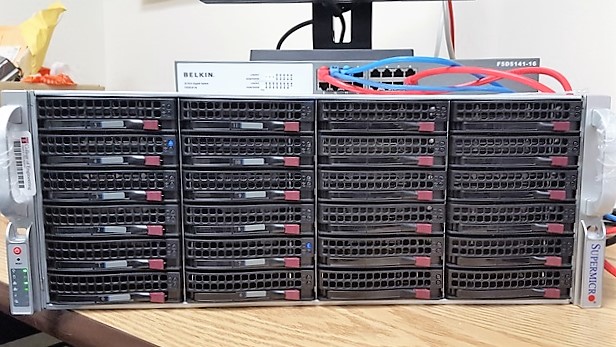
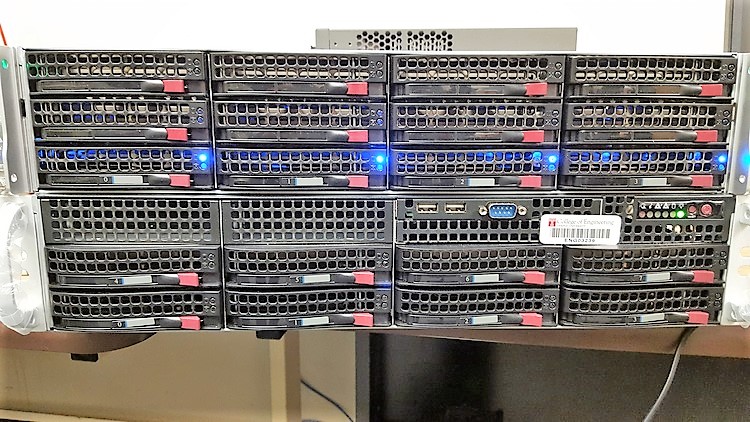
We contacted a few vendors for bidding and found a vendor that really undercut the others. As previously mentioned our budget was ~$27.5k. However with the aggressive pricing we obtained we were able to fully load-out our compute nodes with the maximum amount of memory supported, obtain a beefy main-node, pick up an dedicated web-server and 1Gbe switch. The full specs our machines are listed below. Note we have one main node, four compute nodes, and one web-server.
Main Node (x1):
- 2x Intel Xeon E5-2623v3 (4C) @ 3.0GHz
- 8x 8GB DDR4 @2133MHz (Total of 64GB)
- 2x 480GB Kingston SSD (RAID1) (For Boot)
- 14x WDRE 3TB (RAID10) (21TB Usable)
- LSI 9361I-8i 8 Port RAID Card
- 24-Bay 4U Supermicro Chassis w/ 10GbE
Compute Node (x4):
- 2x AMD Opteron 6378 (16C) @ 2.4GHz
- 16x DDR3 1866MHz (256GB/8GB per core)
- 1x 480GB Kingston SSD
Webserver (x1):
- 1x Intel Xeon E5-2603 v3 (6C) @ 1.8GHz
- 2x 8GB DDR4 @ 2133MHz (Total of 16GB)
- 4x WDRE 3TB (RAID10) (6TB Usable)
So to summarize the parts listed above we have a a centralized main node that will serve as the main node and NFS server. To ensure there are no bottlenecks now (and in the future) we went with two fast Intel Xeon processors. Also the motherboard supports 10GbE in case we add a substantial number of compute nodes in the future and need to upgrade our network infrastructure. Lastly the disks are setup in RAID10 for redundancy and speed.
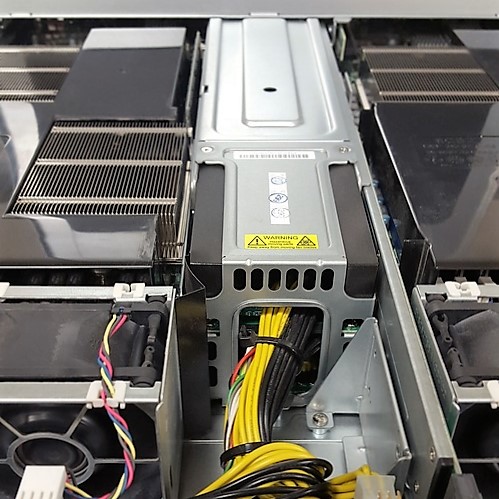
For compute nodes we went with a high core count since our jobs are batch processing based. Also from our tests we saw we needed at least 3.5GB per core to run jobs successfully. Since our budget allowed we actually went with 8GB per core across the nodes. The total core count is 128C with 1TB of ram across all nodes. Lastly we added a SSD to each node so jobs can copy over working files to the local disk in case we run into NFS IO bounded issues. All four compute nodes are housed in a compact 2U chassis.
The web-server is a simple six core processor with 6TB usable of local storage. We will keep the web-server separate from our NFS server to for data security.
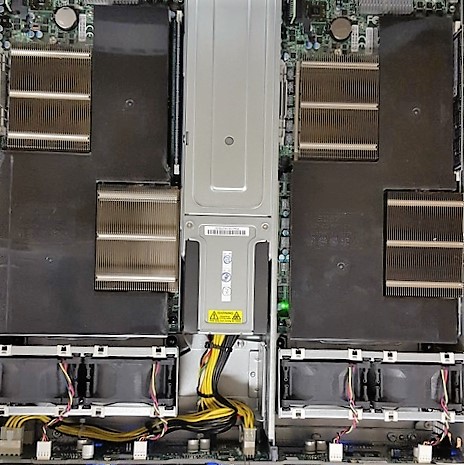
The final configuration reached us on August 20, 2015. Below are some glamor shots.
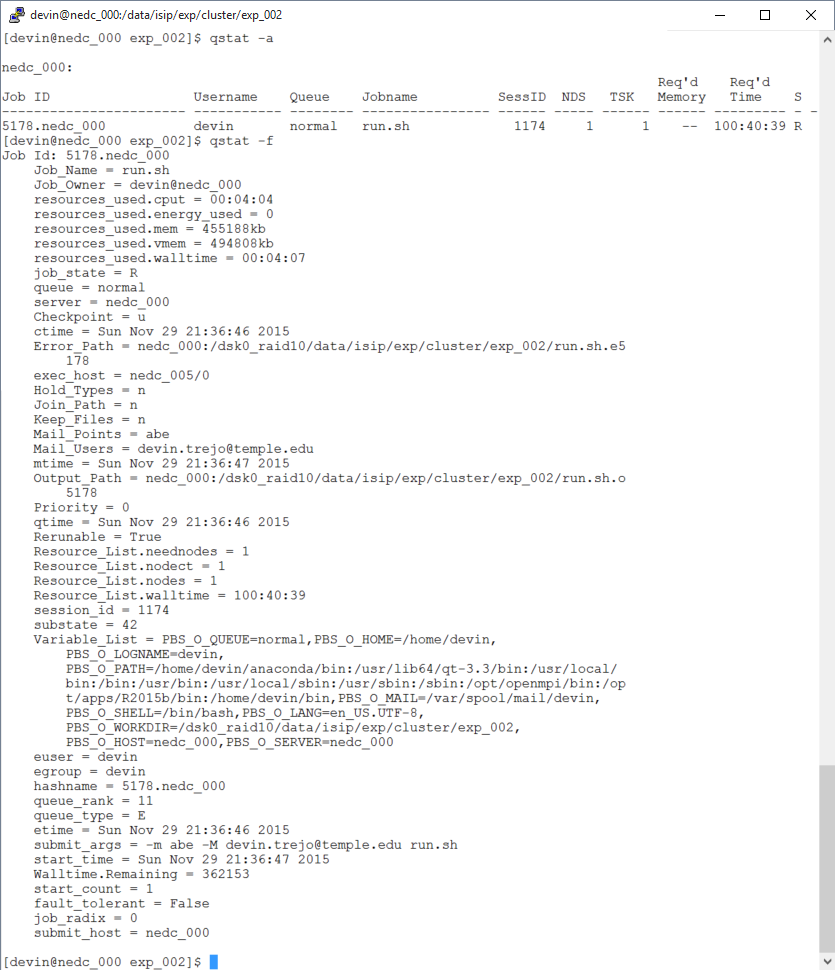
By running the same tests we ran before, we can see how NeuroNix performs
compared to OwlsNest and our now retired NEDC test cluster. The job
starts as soon as I submit since our group has exclusive access to the
cluster. The node that takes on the job is nedc_005
(compute node hostnames=nedc_00[2-5]). On our cluster, multiple jobs can
run on the same node but when I started the benchmark when no other jobs
were running.
The Ganglia statistics are listed below. Since the job is the same we see similar resource usage as we saw before. Note how our CPU speed it 2.4GHz compared to 2.73GHz seen on OwlsNest.
Node Specs
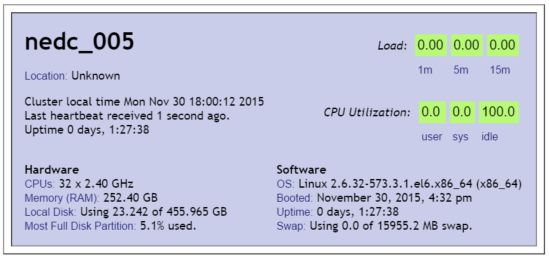
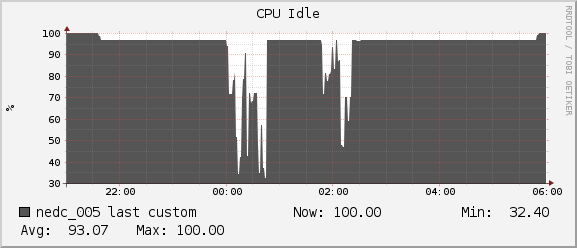
CPU
We see CPU usage fluctuate starting around 12AM. That is because another user started a job at this time. However when the job began (9:36PM) we see how our job is only using approx 3.125% of the CPU. That is because we have 32 cores and the job was focused on running only on one core (100/32=3.125).
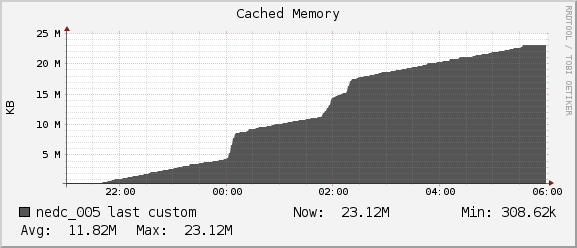
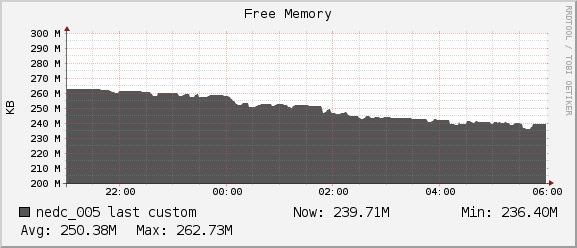
Memory
Throughout the duration of the benchmark and including the extra jobs ran by another user we see we have plenty of headroom for our program to grow. We never dropped below the 236MB of free memory on our node.
Network
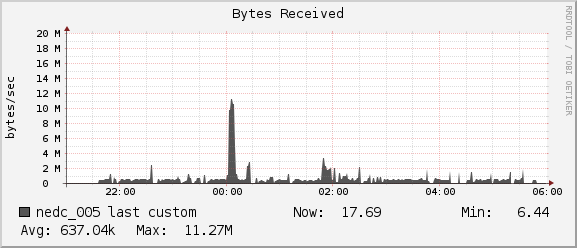
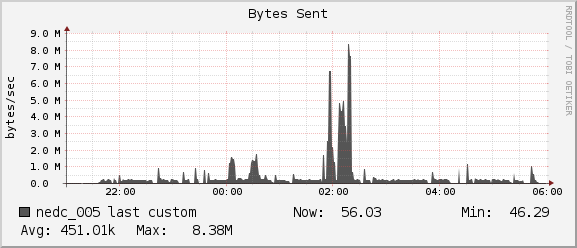
For the duration of our job we see average network usage hover around
1MB/sec for receiving and 0.5MB/sec for sending. The 1Gb interconnect
between nedc_005 and nedc_000 (mainnode) is able to reach speeds of
128MB/sec. Thus we see no bottleneck in our network for this job.
Comparing NeuroNix with OwlsNest and Test Cluster
The results for running the gen_feats benchmark NeuroNix shows us that
our job took 8 hrs to complete. We attribute the slower time compared to
OwlsNest CPU limitations. On OwlsNest we saw a run-time of 5Hrs but that
Xeon CPU is running at 2.8GHz compared to our AMD Opteron running at
2.4GHz. Across the board we see a memory usage of ~3.4GB.
| Resource | (2x) AMD Opteron 6378 (16C) @ 2.4GHz and 256GB RAM (NeuroNix) | Intel Xeon E5506 (4C) @ 2.133GHz and 6GB RAM (NEDC Test Cluster) | Intel Xeon X5660 (6C) @ 2.8GHz and 12GB RAM. (OwlsNest) |
|---|---|---|---|
| Files Processed | 1000 Files Successful | 777 Files Successful | 1000 Files Successful |
| JobName | gen_feats | gen_feats | gen_feats |
| Exec host | nedc_005/0 | n001.nedccluster.com/0 | w066/0 |
| Exit_status | 0 | 0 | 0 |
| CPU Time | 08:07:23 | 07:45:52 | 05:14:17 |
| Memory Usage | 3463740kb | 3459788kb | 3453572kb |
| Virtual Memory Usage | 3503428kb | 3498944kb | 3690128kb |
| Runtime | 08:11:31 | 07:53:22 | 05:19:17 |
The conclusion made therefore is that the real limiting factor was most likely CPU speed. Before there were possibly some IO bottlenecks or memory errors that caused our NEDC Test Cluster to not complete feature generation across all 1000 files. On NeuroNix we did not see any problems and all 1000 EEGS were complete successfully.
Conclusion
In conclusion, we have a working cluster for our research group. What is
important here is that we have exclusive access to resources and
management of the system without being tied down to university constraints.
In our final cluster we have 128 usable cores and 1TB of DDR3 RAM that are
optimized for the experiments we run. The entire cluster is managed by a
central node which we call nedc_000, that serves as a job distribution
manager as well as a centralized NFS system. The four compute nodes are
served a ‘golden image’ version of an OS which we mange from nedc_000. The
‘golden image’ is fetched upon boot of any of the compute nodes using
Warewulf. Since our main node is a high
priority system we ensure it was also adequately equipped to handle heavily
workloads which is why it has 16 cores with 64GB of DDR4 RAM. With the
inclusion of RAID5 and nightly backups to an off-site location we ensure
data integrity.
During the entirety of the cluster project we learned what the available technologies are. We looked at Hadoop and discovered that while it may cutting edge technology is would require an entire rebasing of our current code base. Someone in our group would have to be dedicated to writing MapReduce code so our shell, python, and MatLab code could run on a theoretical Hadoop system. At the moment we would rather have a system in which we could easily transition our existing workflow into. To transition from our existing supercomputer (OwlsNest) we chose to mimic the their system configuration by using Torque (w/ MAUI) as a job scheduler. For cluster monitoring will use Ganglia and Nagios. They allow for monitoring of resources and handling of node failures. For system deployment/configuration we use will use Warewulf.
In the results we found that our cluster is performing correctly with some
limitations in CPU computation speed. The benchmark we ran was gen_feats
“a small program that runs on one CPU core that uses a limited amount of
data”. On our test cluster we ran into potential hardware bottlenecks that
caused the benchmark to not complete over all 1000 files. We saw a run time
of ~8Hrs to complete 777/1000 files. On OwlNest, due to a faster processor,
we saw a runtime of ~5Hrs. However there is potential that a user may be
waiting in the queue for hours. On our final cluster, which we name
NeuroNix, we saw a run time of 8Hrs but with a guarantee of no queue. The
expected limiting component on our new cluster is CPU speed. Note that for
other jobs NeuroNix will perform similar or even faster than Owlsnest
especially is large amounts of memory is needed. The 128 available cores
is also important since we can run multiple jobs in parallel. Allowing for
a larger number of jobs allows more users access to the cluster
concurrently, thus removing long queues wait times. The original goal of
the cluster is so that our research group has complete control over the
computing environment, and in that regard we can say mission accomplished.
If there are any further comments of questions please be sure to contact me.
Image References
- Grid Computing: http://computer.howstuffworks.com/grid-computing.htm
- Cluster Computing: http://proj1.sinica.edu.tw/~statphys/computer/buildPara.html
Acknowledgments
- Research reported in this publication was supported by the National Human Genome Research Institute of the National Institutes of Health under Award Number U01HG008468.
- This research was also supported in part by the National Science Foundation through Major Research Instrumentation Grant No. CNS-09-58854.